
Step-by-Step Guide: SAP GUI Installation.
- JKS Learning

- Feb 13, 2024
- 2 min read
Updated: Feb 16, 2024


Step 1 : Click the below link and copy it and paste in chrome.
Step 2 : paste the URL, then click the download button below.

Step 3 : click on download anyway

Step 4 : Double-click '50152942_2.' after going to the recent download history.

Step 5 : Double click on " BD_NW_7.0_Presentation_7.60_Comp._1_'

Step 6 : Double click on " PRES1".

Step 7 : Double click on " GUI".

Step 8 : Double click on " Windows".

Step 9: Double click on " Win32".

Step 10 : Double click on SapGuiSetup.exe

Step 11 : it It will take five minutes to processed

Step 12 : Click on 'YES'.
Step 13 : Double click on " NEXT".

Step 14 : Select SAP GUI for Windows 7.60 and click on Next to start the installation

Step 15 : It will take five minutes to install and reboot your system, some time
it will not reflect into system, please reboot after that configure your connections.
Configure SAP GUI for Application Server
Once you have downloaded and installed the software, we need to configure it-
Step 1 : Click on the Create icon or variable logon and select Connection, as shown in the figure below:

Step 2 : Enter nothing here; simply click "Next."

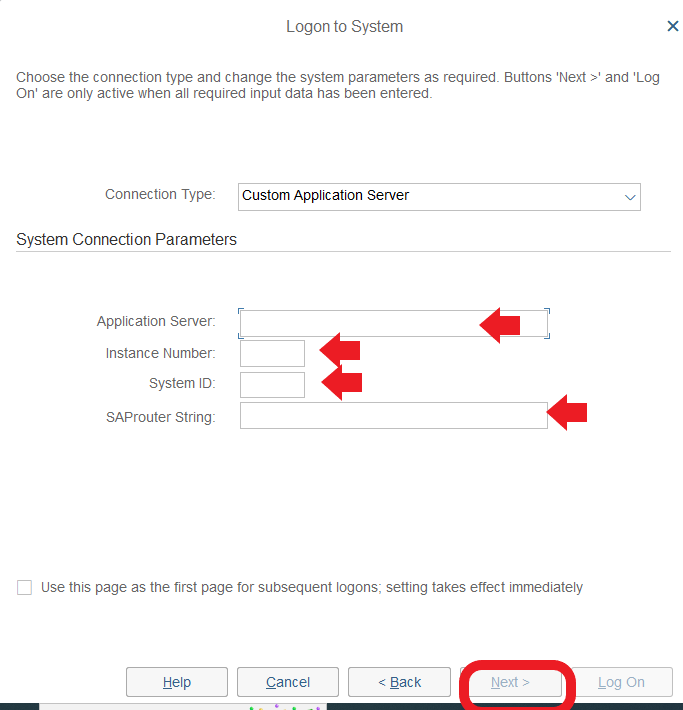
Step 3 : Fill out Server details and click the OK button
Connection Type: Custom application server
Description: Name of the application server instance
System ID: SAP application server ID provided at the time of installation
Instance number: Instance number of the application server where the last two digits are instance number
Application Server: IP address of application server
Example :

Step 4 : Enter nothing here; simply click "Next."

Step 5 : keeping all of the steps Click "next" to complete.
Step6 : At last appear like this , then double-click the system name.

Step 7 : Input your username and password, then hit enter.

Comments